Sunday, August 25, 2013

We Harvested the Wheat!

Saturday, August 24th was a beautiful sunny day, and since it was 91 days since the wheat emerged we decided to harvest it.
Ready For Harvest!
We asked a local farmer for advice about when to harvest. He told us that the wheat would be ready to harvest when we could easily separate the seed by rubbing it in our fingers and having it crack and crunch like a nut when we chewed it. We tried that test a few times, and at the start it was still too green, and the seed would squish instead of cracking. By August 24, the seed was good and dry for harvest.
Finding the seed in the husk

Since our field is so small (32 s.f., or 4x8 feet) we kept the harvesting method really simple...shears and scissors! No combines, no sickles, and no scythes. Kitchen scissors proved to be the best tool for us. We hand-tied each sheaf (or bundle) of wheat with some yarn.
Starting the harvest with grass shears.

These were the best harvest tools for us!
The harvest took us about 40 minutes from the time we started until we had our seven sheaves of wheat.


It was fun cutting the wheat. We were surprised to find out that it was hollow on the inside! Then Mom reminded us that "straws" for drinking are like wheat straw, both are hollow on the inside!
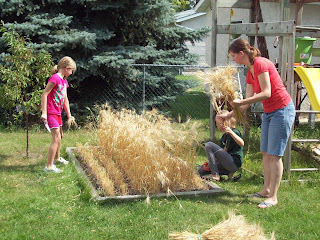
Three rows done, four rows to go!
We made our sheaves using some yarn. Each sheaf got 12 wraps of yarn and then got tied up. Each sheaf was just big enough for an adult to grip with one hand. Looking at all of it bundled makes us wonder just how much flour we will get in the end...it could be a really little loaf of bread, but we will have to wait and see!
Tying off a sheaf. We harvested 7 sheaves in total.
Once the harvest was done it was a bit odd to look back at the stubble field...kind of like looking at a really furry dog right after a super short hair cut. We still are not sure what to do about the stubble. Do we turn it under? Ignore it? We know that many farmers in our region burn their stubble, but we won't be doing that!
All done, but now what do we do with the stubble?
We all found that it was fun to stand, run, and stomp on the stubble after having been so careful about our little field since April.
Having FUN in the stubble!
Once we had the sheaves it was fun taking a few pictures with them, and then Dad figured out a way to hang the seven sheaves in the garage, since they have to dry for a while yet before we figure out how to thresh the grain and how to winnow it.


Our harvest, hanging from the rafters in the garage.
Now the wheat will have to dry for a while and we have to do some research to figure our how to separate the seeds from the stalks. Threshing and winnowing are the processes. Ancient cultures used a large flat rock area for threshing and the wind for winnowing. We will have to figure out a threshing floor of our own.

It is exciting to get this far in the process, and we are getting closer than ever to our loaf of bread!

And that is all we know so far.

Friday, August 2, 2013

Let it Grow, Let it Grow, Let it Grow!

Happy New Month! August is here, and Saturday August 3rd marks 70 days since we first saw the baby wheat poking out of the ground. From what we have found out it should be ready to harvest between 90 and 100 days, which will be Labour Day Weekend.
Starting to change from Green to Gold!
Grandpa Laurie was by the other day to check out the wheat. He figures that the beards on our wheat are bigger than the ones he remembers as a kid on the prairies. Maybe it is because there are different kinds of wheat, and they all look a little bit different from one another.
Measuring up
The wheat now stands between 80cm and 90 cm tall. That's about 32 to 35 inches or so for those who get inches more than centimetres. In a big rain shower the wheat gets heavy and flops over, and the first time it did this we were worried it would stay down, but it didn't. After the sun and wind dry it out it stands back up again. We noticed that we are not the only ones minding the wheat either...the ants seem to like it!
Why do the Ants like the Wheat?
We know that the ants like our peonies and that they help to open the flowers, but seeing the ants in the wheat is a bit of a surprise. No other insects or spiders seem to hang around in the wheat like the ants do. Are they finding something to eat in there?
Neat to see it wave around in the wind too.
The wheat sure looks different than it did when it first emerged as tiny blades of grass. And the yard looks really different from when we started this project on April 20th. There was still snow on the ground! Pretty soon we have to figure out about harvesting, stooking, drying and those steps. Right now we just have to hope for good growing weather for another 30 days. Grow wheat grow!

That is all we know so far.

Wednesday, July 3, 2013

The Wheat has Grown Heads!

On July First we were looking at the field when we got a surprise: THE WHEAT HAS HEADS!!! Some of our wheat started to look like the wheat you might see on a calendar of the Canadian Prairies.
Field Inspection on July First (Canada Day)
Look- it has a head! (Really a "Spikelet")
The heads of wheat are actually called "spikelets". We found this out when we phoned Uncle Paul to tell him about the wheat. Since "spikelet" is a bit weird sounding to us we're just going to call them heads for now. The heads appeared on day 37 after emergence. This seems early measuring against the Feekes Scale, but maybe this kind of wheat just grows faster. We took a few more photos, just for fun:
Three Heads are better than one!

I wonder how this will taste?
The head seems to split the stalk and pop out.

The Flag Leaf ends up off to the side.
Since the wheat is taller now and the heads are so neat to see we decided to take down the bunny fence. The bunnies usually eat smaller things that are closer to the ground so the wheat should be ok now. We are wondering when it will change colour to a golden yellow, and how much taller it will get over the next month or two.
Taking down the bunny fence.
The fence seemed longer stretched out in one line!
Weeding and filling the post holes.

Finding weeds in the middle rows.
...and weeding the edges too!
 So far it seems like the wheat is growing well. In a few days it looks like all of the wheat will have heads, and then it just has to keep growing. We will have to figure out how to tell when to harvest it, but we have time before then. It really is amazing to think about how much goes into making a loaf of bread...we are still just getting started!
Ta Daa! Look! A baby wheat field in our back yard!
Now we weed, wait, and watch. Seeing the fireworks on Canada Day was pretty awesome, but seeing the heads on our wheat was even more awesome! It really doesn't look like long grass any more, we really do have a little wheat field in our back yard.

And that is all we know so far.

Thursday, June 20, 2013

We Thin the Wheat and Battle Bunnies

Once the wheat emerged it only took a few days for us to see that we had planted far too much, and that the field would have to be thinned.
Thinning the Wheat (with a really big knife)
A farming friend suggested that we should thin the field. If too much grows in a small space it might produce smaller heads with less grain. Commercial farmers would also worry about the grade and protein content of the wheat, but we are mostly wanting to make sure that we grow the healthiest crop that we can.  Even if the heads on our wheat are smaller, we will have more of them (since we over-seeded). So, it might all even out in the long run come harvest time. To thin the wheat we used a thin sharp long knife, and cut the wheat off as low on the root as possible. The yellow basket filled to about half-full. Thinning the field was hard work, and it took quite a bit of time. If we do this again we will have learned our lesson: DO NOT over seed!

Another problem we had came in the form of hungry bunnies. It has been hard to get a picture of the critters, but they were eating some of the wheat.
The Wheat at the far left: Chewed to stubble by bunnies.
To keep the bunnies out of the wheat we put up a fence using some old chain link fencing and some poles left over from some other long-ago project. With the field thinned out and properly fenced there has been little to do with the field. We have not watered it at all. We have not used any fertilizer or any herbicides or pesticides. If we have to, we will, but so far the field has done well without needing any extra help.
Thinned and Bunny-proofed
The fence seemed really high to begin with, but our measurements on June 20th (2 months after we started this blog!) show that the wheat is now 15" (38cm) tall. The wheat is already probably tall enough that the bunnies would not eat it any more, but we will leave the fence up for a while yet, since it also protects the field from a wild Frisbee or soccer ball as well. Once the wheat is as tall as the fence we will probably take it down.
June 20: The Wheat is about 15" (38cm) tall

It still looks like really long grass though!
We have noticed that the long leaves feel a bit softer and a bit rubbery or flexible compared to the grass of our lawn, but right now the field just looks like a bunch of grass planted in rows behind a little fence. We have had to explain to a few neighbors that we are growing wheat to make a loaf of bread. One suggested that we just go to the store and buy a loaf, but most of our friends and neighbors share our curiosity and are watching our little field as it progresses. How long will it take before it starts to look like the wheat we see in all of the pictures? Time will tell. Right now we just have to keep it safe and let it grow.

That is all we know so far.

Monday, May 27, 2013

The Wheat Has Sprouted!

On May 26th we noticed that something like grass was growing in our field. We decided to let it grow and not pick it until we could decide if it was a weed or the wheat.
Wheat?? It is growing along the lines where we planted...
By the next day it was very obvious that our wheat had sprouted (or "emerged" as all of the farmers tend to say). Not all of the rows have emerged yet, and we are not sure if that is because of planting depth or sunshine, or who knows what. So much of this is really rather mysterious!
May 27th. Look! Real wheat! Some rows are faster than others.
 Watching it pop up is surprising - it seems like the wheat is busting right through the soil, and picking up large chunks as it emerges.
Look at it lift the soil! Wheat Power!
Lifting the soil. Hmmm...maybe that string is in the way now.
The tallest sprouts we have right now are three inches (about 5 cm) tall, and about 20% of our field has emerged.
Measuring Up
Taking pictures of this is fun, because with the right angle the wheat already looks very tall!
Now that looks like a healthy crop!
There is rain in the forecast, so the wheat will soon get some more water. We have not watered it at all so far, but we did have four days of rainshowers right after planting. In a large field a farmer would not normally water (irrigate) a wheat field, and we are all wondering how the wheat can do so well without needing extra water. It seems like all of the other plants we have need extra water, so why not the wheat? Another mystery. I'm sure that a crop scientist could tell us why our Carberry Hard Red Spring Wheat is so hardy.
Say Cheese! (But is the wheat smiling too???)
Our next step will be to remove the strings, and maybe set up a little fence. We have rabbits who love to eat all kinds of things that we grow in our flower beds and in our garden. We don't know if rabbits eat baby wheat, but they might. A fence could help with that. We also have to figure out the thinning of the rows.

That is all we know so far.

Saturday, May 18, 2013

We Plant the Wheat in the Field

On May 16th the weather was good, and with rain in the forecast the pressure was on to get the field seeded. After consulting a few websites we found out that planting the wheat about 3 1/2" deep would be good. Deciding how many rows to plant was a bigger problem. Some sources said the rows should be at least 10" apart. Others said it could be closer. In the end we decided to plant 7 rows at about 61/2" apart each. This is close, but weeding will be done by hand and access will be simple since it is a small field.
Digging the Middle Row
Since the rows are so close together, we dug a row and then seeded it before we dug the next row. This took a bit of time, but this way we could focus on one row at a time. When we looked into how much seed to plant we found out about the "3 finger" method. The seed on 3 fingers is good for about 10 feet. We put in at least that much, and maybe a bit too much. A gardening friend suggested that if we have over seeded that we can always thin the rows once they emerge. Good idea!
Seeding the Middle Row
Once the seed was in, we back-filled the row, and started over.
Covering the seed...six more rows to go!
Seeding the field took quite a bit of time. Then again, we dug a 3 1/2" trench that was 56 ' long (7 rows x 8' each). Everyone took a turn with the seeding.
Once all seven rows were planted we added one more wheelbarrow full of soil to the top, since we expect the whole field might compact and sink a bit anyways.
Since we wanted to know where the wheat was under the ground, the last step for our seeding was to mark each row using a bit of string and a couple of roofing nails. It will be interesting to see if the wheat emerges where we expect it to pop up.
Now we wait for rain. The good news: this field is so small that we can water it or protect it if we need to. Rain is supposed to be on the way anyhow. To figure out how to get this far we watched a few YouTube videos that were helpful. Here are the links:
From Seed to Loaf (Part 1)
From Seed to Loaf (Part 2)
Wheat School: Evaluating Wheat Varieties
The Seed to Loaf videos are going to be very helpful as we move forward through the steps. The seeding rate recommended in the Seed to Loaf video is 15-20g of seed per m2. 32 s.f. is about 3 m2, so really we should have only used about 60 grams of seed in our little field. We ended up sowing about 207g of seed! We really over-did it...hopefully we can thin the rows once the plants emerge.

As we go we are getting advice from farmers that we know locally, but we are also looking for any help that any of you may be able to provide. Please feel free to post a comment to the blog if you have some ideas about our next steps. Right now we are trying to figure out how long it will take for us to see the first leaf. We have found the Feekes Scale but we are not sure if it will apply for us, given how we have planted. Time will tell! It feels good to get to this point though. Hopefully the over-seeding won't be too much of a problem. Grow Wheat Grow!

That is all we know so far.

We Finish Preparing the "Field"

Since our wheat field is so small, calling it a "field" seems a bit silly. Measuring only 4x8 feet (32s.f.) it really is a little patch of wheat, or maybe even a test plot. So...we might have got a bit too much topsoil to finish the field:
Two yards of topsoil, please!
Not to worry though. The extra topsoil will go into our veggie garden and flowerbeds. The wheat field took about seven wheelbarrows full to fill up the wood frame (made from the old swing set posts).

The next step was to fill it up, and then to level it out. We used an old board as a screed to smooth the top.
We thought we'd better pack the soil down a bit. Some people use a lawn roller for this step, but since our field is so small we tamped down our soil with a couple of 2x6 "shoes" held on with a bicycle inner tube as laces. It was a bit odd, but we all had fun wearing the funny shoes.
So getting the field ready took about two hours, including cutting up the frame and staking it into position. At the end of May 15th, the field looked like this:
We are still not exactly sure how many rows we will put in, but the day has come to an end, and that will give us time to figure out what comes next. The weather forecast calls for rain soon, so getting the wheat planted before the rain would be really good.

That is all we know so far.